Welcome to the world of Tree of Savior!
As a rising new Savior the world can appear quite dangerous,
but there is no need to fear as we have the tips and knowhow to ensure your first few steps are successful.
Here in Tree of Savior, you can customize a unique character by progressing on a course based solely on your own design!
However, before you can run, you have to learn how to walk,
aka. you have to choose a base character to begin your adventure.
So on that note...
Q. What type of Combat do you prefer?
A. You got Swordsman!
Check out the link below to learn more about the basic abilities of Swordsmen.
If the way of the sword speaks to you, then lets move on to the next step: creating a character!
B. You got Archer!
Check out the link below to learn more about the basic abilities of Archer.
Time to go for Archer! Let's try create character
With bow in hand, let’s create your character!
C. You got Wizard!
Check out the link below to learn more about the basic abilities of Wizard.
Ready for Wizard? Now lets find out how to create a character
D. You got Cleric!
Check out the link below to learn more about the basic abilities of Cleric.
Neat isn’t it? Now the next step is to create one!
Alright little Savior, let’s talk about your character.
Before you can even start adventuring you have to have a body, no? Creating your character is the first step towards interacting with others in the World of ToS.
Hm...we also have to talk about the user interface and class advancements but let’s not get ahead of ourselves.
Let’s just concentrate on “how to create” a character first.
So you want to learn about the user interface? The user interface, or UI, is how you will click, move, and examine your way around the world of ToS. You better keep a close eye on it!
Here, we would also like to provide you with some basic information on chatting, maps, HP/SP, stamina and such. We will even show you where you can change the game settings!
Selecting a Class in Tree of Savior doesn’t mean you will carry that Class until the very end.
Instead, for every 15 class levels you can change your class via Class Advancement.
Right now, you can advance up to 7x! That’s a total of 8 when counting your base class.
How about we slow down and talk about this some more?
We can even have a small chat about your character’s abilities. You know, things like status, rank, and skills.
So now you have a character ready to pave their own path in the world.
But, wait.. You’re not seriously going out in that are you?
Did you know there are various costumes options you could use to dress up and walk the ToS runway?
Here’s a little secret: when you Class Advance you will also receive a Class Costume but you can receive even more special costumes by visiting the TP shop!
Special souvenirs! On every great journey you tend to collect things on the way, no?
It could be a sea shell, perhaps a little acorn?
In Tree of Savior, if you explore diligently you will find that some maps give you the chance to gather special collections!
When you successfully gather a complete collection you’ll be granted special effects.
Oh and don’t forget to collect your special rewards that can only be gained through achievements!
(slaughter 500 hanamings for hair dye)
Sometimes we face the enemy alone. Other times, we fight alongside friends and teammates.
But did you know you can get just the cutest little thing to fight alongside with you!?
with.. Proper silver and one character slot..
They are called Companions!Welcome Savior, and thank you for taking time out of your busy schedule to talk with me.
Are you enjoying things so far? At this stage in your adventure I bet you have seen and heard many tales but I bet you still have some lingering questions.
So let’s get to it.
If you tell me your level, I can provide you with more specific trade secrets.
Well, Savior, you are still in the early stages of your adventure. Cherish those first memories~
Here we will provide you with a few more guides to “guide” your journey. Hehe.
Whew! How’s the view from Fedimian?
It must have seemed like a long trip but wait, there’s more!
You have almost reached the final stage,
but this doesn’t mean that this is the end of your adventure!
What else can do you? Let us find out!
Welcome Savior, or should I say, Welcome back?
The Goddess will be delighted to hear of your return!
Here are the great changes that happened in recent months.
Read through them and you will feel your power returning to you.
Since Fall of 2016, these major updates have come to the game
Since Winter of 2016, these major updates have come to the game
HOT GUIDE
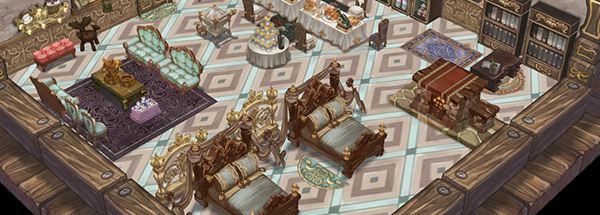
Personal Housing
Personal Housing - Personal Housing is a team base content that allows you to decorate your own Housing and collect housing points to use various functions of Personal Housing contents. ※ Following contents can be changed according to the updates. 1. How to use Personal Housing - In order to use the private housing, activation of Personal housing is required once per team at first and once it’s done, you can come and go to activated Personal Housing freely. - Personal Housing item will be given as a reward if you activate the Personal Housing. - Players with a team level of 10 or above can use the ‘Personal Housing’ button in the three cities, Klaipeda/Orsha/Fedimian to open the Personal Housing Board and access various functions. - Personal Housing can be activated by clicking the (My House) button in Personal Housing Board - Activation of Personal housing is required once per team at first, Personal Housing item will be given as a reward if you activate the Personal Housing. 2. Move to Personal Housing - If you want to move to your own or another person's personal housing, click the post or (My house) button on the Personal Housing Board, and click the ‘Move to Housing’ button. - You can also right-click the user’s character you want to move to, and click to 'Move to Personal Housing' button. 3. Decorate Personal Housing - Personal Housing consists of three types of items: [Furniture], [Wall], [Carpet] and it can be used as decorations. - [Furniture], [Wall Decoration] items can be purchased by silver in [Furniture Shop] inside Personal Housing. ※ Guild Housing button cannot be used due to deactivation. f - Item purchased through [Furniture shop] can only be sold in [Furniture Shop] and will be paid with a voucher as the same quantity of the sale price. - In the case of [Carpet], you can obtain it with a certain chance by using your Personal Housing Point through the [Housing Helper Kupole] NPC. - The acquired personal housing items can be placed in edit mode or by right-clicking the item in the inventory. Placed items can be moved or removed in edit mode, and all items can be removed by clicking the Dismantle All button. Removed items will be back in inventory. - [Wall Decoration] type items can only be placed in the wall and can be placed on the location(floor) where you want. The floor can be changed by ctrl + moving the mouse wheel up and down. ※Some items can only be placed in designated directions. - [Carpet] type items can be additionally placed with furniture type items in the installed position after installation. - Groups are set for each furniture, and the number of furniture that can be placed is decided by the group. Groups are set for each furniture, and the number of furniture that can be placed is determined according to the group. - Decorated items can be saved and recalled in real-time by using [Page Function]. - You can change the background of the Personal Housing, and it can be purchased by silver. Purchased background can be changed by See Background function. 4. Use Personal Housing Points - Private housing has the following points Type Content Personal Housing Points If Personal Housing is activated, you get 10 points per 30 minutes when login, and if you collect certain points, it can be exchanged with House Setup Support. Personal Housing Points can be collected up to 1,000 points per team. Placement Points This is a point to be renewed when installing a Personal Housing item. When a certain number of items are accumulated, the level of the individual housing increases, and decreases when it falls. Placement points can be found in the tooltip of the Personal Housing item. Personal Housing Level Personal Housing Level increases when a certain number of Placement Points are accumulated. This adds functions that can be used by Personal Housing Points. ※ Check the Personal Housing Points by the /personalhousing Command. 5. Personal Housing Board - You can promote your own Personal Housing by using the Personal Housing Board and easily visit friends’ and guild members’ Personal Housing. - When you enter Klaipeda/Orsha/Fedimian, the ‘Personal Housing’ button on the left side of the minimap will activate, and you can click on it to use the Personal Housing Board. Also, you can right-click the character to move to the target's personal housing through the ‘Move to Housing’ menu. - Each field’s recommendation houses such as likes and the most visited house can be checked by the House Recommended tab on Personal Housing. You can also visit other user’s Personal Housing by searching the team name even if the user is not connected to the game. - When you select the My House tab, you can check your personal housing information and choose a public option. In addition, the contents that can be checked with /personalhousing command can be checked at a glance through the corresponding function. - Go to your own Personal Housing by clicking ‘Move to Housing’ button. - Personal Housing posts can be edited by clicking Edit button. - Register the thumbnail images you edited yourself through import. Or, you can shoot a random Thumbnail that meets the standard by Film. - If you post Thumbnail images, Personal Housing post titles, Streaming Channels, etc. that are inappropriate for the purpose of the content, they may be edited or deleted without prior notice. - Thumbnails can be saved and imported in the UploadThumnail folder where the game is installed. - To use the Personal Housing Board inside the Personal Housing, select the personal Housing Board button in the edit mode inside your own Personal Housing. 6. Housing Workshop - [Housing Workshop] function that allows creating consumables in the Personal Housing is added. - You can check the Reputation Point crafted and currently installed housing items from the [Housing Workshop: Consumable] category. - You can check the efficiency, number crafted, and the time remaining until you receive the consumable from the [Consumable Status Board]. - Crafted consumables will be reset every Monday at 6 AM server time and the consumable reset can not be recovered. - Steam Punk theme housing item that can craft Reputation Point is added. - You can exchange the new background theme ‘Steam Punk Housing Background Unlock Voucher’ with 1,000 Kingdom Reconstruction Coin from the Reputation Shop Lv1 or above in Episode 13 area. (Once per team) - You can obtain the Steam Punk theme items by clearing Reputation quests, hunting in the field, or from Reputation Shop and Content Point Shop. Item Condition to Obtain Crafted Points [Personal Housing] Steam Punk Report After completing Start Reputation Quest 1 point [Personal Housing] Steam Punk Round Blanket 6 points [Personal Housing] Steam Punk Chess Board 2 points [Personal Housing] Steam Punk Gas Light Obtain ingredient by a certain chance after defeating monsters in [Lemprasa Pond] 3 points [Personal Housing] Steam Punk Hourglass Obtain ingredient by a certain chance after defeating monsters in [Woods of the Linked Bridges] 7 points [Personal Housing] Steam Punk Jukebox Obtain ingredient by a certain chance after defeating monsters in [Paupys Crossing] 4 points [Personal Housing] Steam Punk Partition Obtain ingredient by a certain chance after defeating monsters in [Issaugoti Forest] 3 points [Personal Housing] Steam Punk Laboratory Carpet Obtain ingredient by a certain chance after defeating monsters in [Kirtimas Forest] 12 points [Personal Housing] Steam Punk Drawer [Lemprasa Pond] Reputation Shop Lv2 (Kingdom Reconstruction Coin x240) 2 points [Personal Housing] Steam Punk Doctor's Chair [Woods of the Linked Bridges] Reputation Shop Lv2 (Kingdom Reconstruction Coin x360) 3 points [Personal Housing] Steam Punk Steam Engine [Paupys Crossing] Reputation Shop Lv2 (Kingdom Reconstruction Coin x480) 4 points [Personal Housing] Steam Punk Versatile Desk [Issaugoti Forest] Reputation Shop Lv2 (Kingdom Reconstruction Coin x840) 7 points [Personal Housing] Steam Punk Blueprint [Kirtimas Forest] Reputation Shop Lv2 (Kingdom Reconstruction Coin x360) 3 points [Personal Housing] Steam Punk Fancy Assistant Content Point Shop (10,000 points) 4 points [Personal Housing] Steam Punk Striking Clock Content Point Shop (10,000 points) 4 points ※ All items can only be transferred via team storage or sold at shops. ※ When you have already cleared the Start Reputation quest, you can obtain the item once per team by talking to the NPC [Kingdom Reconstruction] Orsha Officer. ※ You can collect 40 ingredients from the field and combine them into a Steam Punk theme item. (The ingredient that can be obtained varies per area and 40 items from the same area must be collected to create the housing item of the area.) ※ Ingredients obtained from the field are not affected by the Looting Chance. ※ Item sold at the Content Point Shop can be purchased once per team. ※ You can only purchase the Steam Punk item when all Reputation Shop is Lv1 or above and each item sold at the Reputation Shop can be purchased 10 times per team.
TP/Exchange Shop
TP/Exchange Shop You can enter the TP Shop by clicking the TP icon next to the minimap in towns. - You can purchase Premium Items, use Exchange Shop, and move to the Beauty Shop via TP Shop. - You can purchase items with Exchange Medals, or exchange items for medals at the Exchange Shop. TP (1) What is TP? TP is a point that you can use to change your team/character name, and purchase TP items or so. TP TP is a Tree of Savior Point you can use in each server. Obtained Via You can obtain TP by accumulating free TP over time, as event rewards, or by purchasing TP bundles from Steam. TP Merchant TP Merchants are in each city. You can purchase Tokens and other consumable items from them. (2) Obtaining TP 1) Free TP - You will accumulate 1 TP every 2 hours, even when you aren't logged in. ※ However, TP will only start to accumulate after you have a team created in a server. - Your account will accumulate a total of 5 TP for free. - After you have accumulated 5 free TP, it will stop accumulating. -To check how much TP you have, see the lower section of your inventory or your lodge. 2) Purchasing TP STEP 1 : Select and purchase the product for your regional server -First of all, you must select and purchase a TP Bundle usable on your regional server. For instance, if you play on the NA servers, you must purchase one that states ‘Exclusive for North America’. -Please remember that you should be selecting a region that matches the server you play on, not where you are playing from. For instance, if you are playing from the US, but are playing on SEA servers(Telsiai or Varena), you should be purchasing items that read ‘Exclusive for South-East Asia’. STEP 2 : Claim for the TP in-game - Click the TP icon next to your minimap. Once you open it, TP that you've purchased will appear. If you don’t see it appear within 24 hours, please make sure to contact us via the Ticket Support System and we’ll be more than happy to help. - You will be able to claim your TP once you click on the ‘Use’ button. Once you click the Use button, your TP will be added to your remaining TP automatically. ※ The content above is subject to updates and modifications. Exchange Shop - Exchange Shop is a shop where you can purchase items using Exchange Medals. - You can earn Exchange Medals by exchanging items you've obtained through Goddess' Blessed Cubes. [Making the Exchange] 1. Click on the Exchange Shop tab from the TP Shop window. 2. Click 'Exchange item for medals' to see the items that you can exchange. Exchange Medals (Market) 1. Go to the [Market] via Market NPC in each town or by clicking the icon next to the minimap. 2. Click the [Hair Accessories] category and see the registered accessories. 3. Hover the mouse at the registered items to see if 'Can be exchanged for 17 medals at the Exchange Shop' is stated on the tooltip. 4. Purchase the item and receive it via [Retrieve tab]. 5. Open the [TP Shop] and exchange it for medals! ※ There won't be extra medals even if you've enchanted the accessory. ※ Other items besides Hair Accessories can be exchanged for medals if 'Can be exchanged for medals at the Exchange Shop' is stated on the tooltip. ※ The content above is subject to updates and modifications.

Game Installation and Execution Errors
※ Use Ctrl+F to search for your error! ▶ “There may be a problem with the game. Please install the latest version of DirectX .” 1. This error can be solved by manually reinstalling DirectX. 2. Follow this link to reinstall DirectX in your PC: [Download DirectX End-User Runtimes] ▶ “The .ipf files are damaged and cannot be read. The client will now shutdown.” 1. Restart the game. 2. If that doesn’t solve the issue, completely remove TOS from your PC and reinstall it. - Go to Control Panel > Programs > Programs and Features, and remove Tree of Savior. - Remove the Tree of Savior installation folder from the location where it was saved. - Reinstall Tree of Savior from Steam: [Tree of Savior (English Ver.)] ▶ Missing .dll files 1. This error can be solved by manually reinstalling DirectX. 2. Follow this link to reinstall DirectX in your PC: [Download DirectX End-User Runtimes] ▶ "Runtime Error!" 1. Install Visual C++. - Check your Windows version under Control Panel > System and install the correct Visual C++ package for your PC. - Microsoft Visual C++ 2010 Redistributable Package (x86) / 32 bit [Download] - Microsoft Visual C++ 2010 Redistributable Package (x64) / 64 bit [Download] - Visual Studio 2013 Microsoft Visual C++ Redistributable Package [Download] 2. Update your graphics card drivers to the latest version. - Nvidia [Download] - ATI [Download] - Intel [Download] 3. Update DirectX to the latest version: [Download] 4. Completely remove TOS from your PC and reinstall it. - Go to Control Panel > Programs > Programs and Features, and remove Tree of Savior. - Remove the Tree of Savior installation folder from the location where it was saved. - Reinstall Tree of Savior from Steam: [Tree of Savior (English Ver.)] ▶ Updater MFC error Completely remove TOS from your PC and reinstall it. - Go to Control Panel > Programs > Programs and Features, and remove Tree of Savior. - Remove the Tree of Savior installation folder from the location where it was saved. - Reinstall Tree of Savior from Steam: [Tree of Savior (English Ver.)] - The installation path must be written in English ▶ Missing addon files error Completely remove TOS from your PC and reinstall it. - Go to Control Panel > Programs > Programs and Features, and remove Tree of Savior. - Remove the Tree of Savior installation folder from the location where it was saved. - Reinstall Tree of Savior from Steam: [Tree of Savior (English Ver.)] ▶ Failed to download files error 1. Close all unnecessary programs, then restart the game and patch the client. 2. If that doesn’t solve the issue, completely remove TOS from your PC and reinstall it. - Go to Control Panel > Programs > Programs and Features, and remove Tree of Savior. - Remove the Tree of Savior installation folder from the location where it was saved. - Reinstall Tree of Savior from Steam: [Tree of Savior (English Ver.)] 3. If that doesn’t solve the issue, remove the files below and restart the game. - Go to your Tree of Savior installation folder. - In the release folder, delete the release.revision file. - Restart the game. 4. If the issue persists, there may be a problem with your network. Try disconnecting from your router and using a LAN connection to patch and run the game. ▶ “Windows cannot access the specified device, path, or file. You may not have the appropriate permissions to access the item.” 1. Exclude the Tree of Savior execution file (Client_tos.exe in the release folder) from your antivirus program. 2. Right-click the Client_tos.exe file and run it as administrator. 3. If that doesn’t solve the issue, completely remove TOS from your PC and reinstall it. - Go to Control Panel > Programs > Programs and Features, and remove Tree of Savior. - Remove the Tree of Savior installation folder from the location where it was saved. - Reinstall Tree of Savior from Steam: [Tree of Savior (English Ver.)] ▶ "Only one Tree of Savior client can be run at a time." 1. Press Ctrl+Alt+Del to open the Task Manager. 2. In the Processes tab, close Client_tos.exe and restart the game. 3. If that doesn’t solve the issue, reboot your PC and try again. ▶ Black/white screen errors 1. Check your PC specifications under Control Panel > System and check whether they surpass the minimum requirements for Tree of Savior: CPU: Intel Core2Duo RAM: 4 GB Graphics: NVIDIA Geforce 8600GT or higher OS: Windows XP DirectX: 9.0C 2. Update your graphics card drivers to the latest version. - Nvidia [Download] - ATI [Download] - Intel [Download] 3. Update DirectX to the latest version: [Download] 4. If that doesn’t solve the issue, completely remove TOS from your PC and reinstall it. - Go to Control Panel > Programs > Programs and Features, and remove Tree of Savior. - Remove the Tree of Savior installation folder from the location where it was saved. - Reinstall Tree of Savior from Steam: [Tree of Savior (English Ver.)] ▶ "The application was unable to start correctly (0xc000007b)." 1. Your XlNPUT1_3.dll file may be corrupted. - Go to C: > Windows > SysWOW64 and delete the XlNPUT1_3.dll file. - Update DirectX to the latest version: [Download] 2. If that doesn’t solve the issue, install Visual C++. - Check your Windows version under Control Panel > System and install the correct Visual C++ package for your PC. - Microsoft Visual C++ 2010 Redistributable Package (x86) / 32 bit [Download] - Microsoft Visual C++ 2010 Redistributable Package (x64) / 64 bit [Download] - Visual Studio 2013 Microsoft Visual C++ Redistributable Package [Download] 3. Then, update your graphics card drivers to the latest version. - Nvidia [Download] - ATI [Download] - Intel [Download] ▶ “The client has been shutdown due to an error." We are working towards optimizing the game in order to prevent this error from occurring. For now, please restart the game. ▶ Character has no head/character has their arms open 1. Completely close your TOS client and restart the game. 2. If that doesn’t solve the issue, check your PC specifications under Control Panel > System and check whether they surpass the minimum requirements for Tree of Savior: CPU: Intel Core2Duo RAM: 4 GB Graphics: NVIDIA Geforce 8600GT or higher OS: Windows XP DirectX: 9.0C 3. Update your graphics card drivers to the latest version. - Nvidia [Download] - ATI [Download] - Intel [Download] 4. Update DirectX to the latest version: [Download] 5. If the issue persists, completely remove TOS from your PC and reinstall it. - Go to Control Panel > Programs > Programs and Features, and remove Tree of Savior. - Remove the Tree of Savior installation folder from the location where it was saved. - Reinstall Tree of Savior from Steam: [Tree of Savior (English Ver.)] ▶ Character is whited out 1. Completely close your TOS client and restart the game. 2. If that doesn’t solve the issue, check your PC specifications under Control Panel > System and check whether they surpass the minimum requirements for Tree of Savior: CPU: Intel Core2Duo RAM: 4 GB Graphics: NVIDIA Geforce 8600GT or higher OS: Windows XP DirectX: 9.0C 3. Update your graphics card drivers to the latest version. - Nvidia [Download] - ATI [Download] - Intel [Download] 4. Update DirectX to the latest version: [Download] 5. If the issue persists, completely remove TOS from your PC and reinstall it. - Go to Control Panel > Programs > Programs and Features, and remove Tree of Savior. - Remove the Tree of Savior installation folder from the location where it was saved. - Reinstall Tree of Savior from Steam: [Tree of Savior (English Ver.)] If you are still encountering installation and/or execution errors in the game, please file a ticket at the Support page for further assistance. 1. Go to https://treeofsavior.com/page/support 2. Log in through your Facebook or Google account. 3. Click Submit Ticket. 4. Select the category of your ticket. 5. Select your server, enter your account info and describe the issue to submit the ticket.
GUIDE
First time playing? : The Basics
Just getting started? : Developing Your Character
Got the basics down? : Useful Functions For Everyone
- Weapon/Armor with Fixed Stats
- Party Matching
- Gear Score/Attribute Point Score
- Challenge Mode
- Hunting Grounds/Sole Hunt/Unknown Sanctuary
- Legend Raid Dungeon
- Goddess Raid Dungeon
- Goddess Equipment
- Remnants of Bernice
- Adventure Journal
- Collection/Achievement/Master's Request
- Title Buffs
- Fishing
- Content Point Shop
- Personal Housing
- Assister
- Fedimian Public House
- Res Sacrae
- Heroic Tale
- Bounty Hunt
- Goddess Message
- Kupole System Guide
Want to experience more? : Other Gameplay Features
- Ichor System
- Item Set Stats
- Arts
- Ark
- Weapon Type Change
- Team Battle League
- Field Co-op Gimmick
- Weekly Boss Raid
- Joint Strike Raid
- Reputation
- Pilgrim
- Guild - Basic Info
- Guild Promotion and Community
- Guild - Guild Quest and GTW
- Guild Hangout and Housing
- Extracting Luciferie Property
- Archaeology
- Arcanum Brewing
- Advanced/Bright Enchant Scroll